Tuesday Morning Sketch #207
Happy Tuesday stampers! For the month of July, Tuesday Morning Sketches is revisiting some of it's older sketches... so, if you've been playing along for a while, you might recognize the next few sketches.
I was excited to see this week's sketch make a come back... it was originally sketch #149 and was the first time I played along at Tuesday Morning Sketches... I was also the lucky winner of the prize that week! So, this sketch brings back fond memories for me! :)

Our sponsor this week is My Creative Classrom, and it's also our Judged Challenge week, so we have a little twist for you... use an ANIMAL on your creation.
I have been eyeing these cute Wee Stamps from Whimsy Stamps for a while, and my sweet sister bought me a few to play around with... this is the first chance I've had to ink one of them up! I actually forgot about the twist this week, but I think it still counts, because she is holding an animal!

Supplies: Hammermill White CS; Neenah Desert Storm CS; MME Mabel 6x6; Memento Tuxedo Black Ink;
Antique Linen and Gathered Twigs Distress Ink; Twil Ribbon; Labels 1 Nesties; Glitter; Copics
This is Suzi with Bunny... how cute is she?! I love her sweet little face, and she sure is fun to color! I've paired her with some paper from My Mind's Eye, and colored her with Copics. The sentiment is from AmyR Spring Sentiments and is stamped onto the smallest of my Labels 1 Nestabilities (cut in half).
Here is a close up of Suzi... I'm pretty happy with how the coloring turned out, and I even added a little glitter to the flowers in her basket.

Copics Used:
Skin - E11, E00, E000, YR0000, R00
Hair - E57, E55, E31, E30, E50
Basket - E44, E43, E42, E41, E40
Bunny - W5, W3, W1, W0, W00
Bunny Ear, Nose - R30, R000
Apron, Shoes - W3, W1, W00
Pants - BG18, BG72, BG70
Shirt, Bow - YR24, YR23, YR21, YR20, E50
Grass, Leaves = YG67, YG17, YG25, YG03
Flower Centers - Y17
Now head over to the Tuesday Morning Sketches Blog to see the line up from the team!
Have fun with this easy sketch this week!
Linking up at:
Cute Card Thursday - Good Luck Charm (rabbit's foot!)
Comments (18)
C.C. Designs Special Release!
You are in for a treat today!! C.C. Designs is having a *SPECIAL* release to introduce a new line of stamps... Roberto's Rascals. These little tots are so cute and playful, and I can't wait to see more from this new artist! There are three new images being released - Twila, Henry, and Funny Faces.
I've used Funny Faces today... aren't they adorable?! They are just like my kiddos when I am trying to take their picture!! The layout is the current Sweet Sunday Sketch, with a couple of tweaks to work with the image. I've also used a sentiment from the Brothers and Sisters Sentiments set.

Supplies: Hammermill White CS; TAC Navy CS; Neenah Desert Storm CS; MME Memories 6x6;
Memento Tuxedo Black Ink; Button; Floss; Copics
Copics Used:
Skin - E11, E00, E000, YR0000, R00
Hair (boy) - E55, E31, E30, E50
(girl) - E29, E27, E25, E23
Toungues - R22, R20, R000
Eyes - B26, B23
Shirt (boy) - B99, B97, B95, B93 and T2, T1, T0
(girl) - Y23, Y21, E50 and T2, T1, T0
Skirt - B95, B93, B91
Are you ready to see more of Roberto's Rascals?? Head over to the C.C. Designs Blog to check out what the rest of the Desgn Team has cooked up for you!
Enjoy the eye candy, and thanks so much for stopping by today!
YNS Fun Friday - Beach Day Ellie
It's time for some Fun Friday inspiration!
If you haven't played along at the new Your Next Stamp Challenge Blog, you need to check it out! Every month we have a new challenge (a combination inspiration photo and sketch), and each Friday of the month, the Design Team will be bringing you some AMAZING inspiration for the challenge! And of course, there are PRIZES! One random lucky winner will receive a $10 Gift Certificate to the YNS Store, and one shining star will be chosen to join the team as Guest Designer! Plus... you can use any company stamps you want!
Sounds like FUN, right?! Are you ready to play??
Here are the sketch and inspiration photo we are challenging you with this month... choose one, or combine the two!


I actually chose the photo for my inspiration this week, NOT the sketch... can you believe it?! I'm such a sketch junkie, I actually surprised myself! But, those bright colors just screamed summer, and I had this fun, colorful fishy paper I've been wanting to use...
I colored Ellie and her crab from Ellie Loves the Beach using my Copics, and fussy cut them out. Ellie's swimuit is paper-pieced, but I did a little masking on it first (the original image has a flower on her suit). All patterned papers are from the Fancy Pants Beach Babe 6x6 pad. I used a scrap of blue to cut waves using the YNS Wave Border Die. I made the sand by tearing the edge of another scrap, and used the YNS Puffy Cloud Dies to create the sponged cloud background. The sun was from one of the pages in the paper pad, and I cut it out with my Circle Nestabilities. Finished it off with a sentiment from the new Austin set.

Supplies: Hammermill White CS; Wausau Black CS; Fancy Pants Beach Babe 6x6; Memento Tuxedo Black Ink;
Wave Border Die; Puffy Cloud Dies; Circle Nesties; Ribbon; Pop Dots; Copics
Copics Used:
Skin - E11, E00, E000, YR0000, R00
Hair - YR24, Y26, Y21, Y13, Y000
Lips - R30, R000
Crab - YR18, YR15, YR12
Shading on Swimsuit - C3, C1, C0
I got a little carried away with this card... I just kept adding more stuff! Not my typical simple style! I was also playing around with hair colors, and tried out a new color combo... what do you think???
I'm pretty happy with how this one came out! :)
Now it's your turn! You have until the end of the month to link up your creation at the Your Next Stamp Challenge Blog.
Can't wait to see what you come up with!
Panda Love
Hi everyone! Just popping in to show you another cute panda. I love these new pandas from Digistamp Boutique... they are totally adorable, and make for a pretty quick card!

Supplies: Hammermill White CS; Wausau Black CS; BoBunny Love Letters 6x6; Bazzill CS;
Tracing Wheel; Lil Inker Designs Heart Die; Scalloped Rectangle Nesties; Copics
Copics Used:
Panda - W3, W1, W0
Hearts - R37, R35, R32, R43 / R22, R20, R30 / R30, R00, R000, R0000
That's it for today! Thanks for stopping by!
Linking up at:
Fairy Fhiona and Ribbon Flower Tutorial
Hi everyone! It's my turn to post on the Your Next Stamp Blog, so I put together a little tutorial on how to make a Gathered Ribbon Flower.
A few supplies you will need:
scissors, saddle-stitch ribbon in green and another color of your choice (I used 3/8" ribbons), ruler, glue dots (not pictured - I used 1 large, 2 mini)

The first step is to cut your ribbon... no need to be exact. I cut my pink ribbon to about 8 inches (this will be the flower), and the green ribbon to about 1 1/2 inches (this will be the leaf).
Take the 8 inch ribbon, and pull out the stitching a little from each end (make sure you are pulling at the stitching running along the same side of the ribbon).
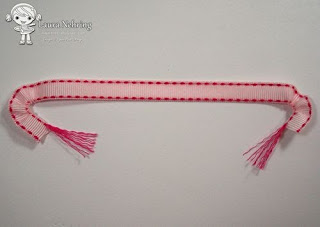
With one hand, put the two ends together, and pinch the loosened stitches where they meet the ribbon.

With your other hand, grab the stitches hanging below, and pull slowly to gather the ribbon.
Once the ribbon is gathered, tie the loose ends of the thread together. The tighter you can get it, the better.

After you've tied a knot, just cut the excess string.

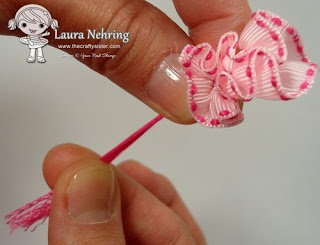
Now we are ready to make the leaf. Take the green ribbon (cut to about 1 1/2 inches) and stick one end of it onto a large glue dot. I buy the glue dots on a roll, so I just cut one off, keeping the backing in place. Once the ribbon is in place, stick a mini glue dot on top.


Fold the other side of the ribbon over, sticking it to the mini glue dot. Add the other mini glue dot on top.

Now you can stick your gathered ribbon on top of the leaf. Make sure to tuck the raw edges of the ribbon underneath, then smoosh it around a bit till you like the look of it!
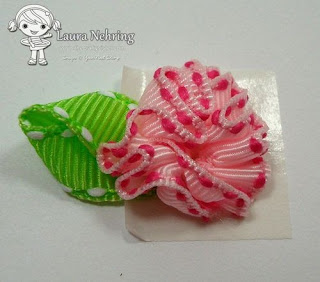
And now you have a simple little embellishment ready to add to your project.

Supplies: Hammermill White CS; Wausau Black CS; Doodlebug Patterned Paper; Memento Tuxedo Black Ink;
Circle Nesties; Stardust Stickles, Ribbon, Glue Dots, Copics
Copics Used:
Skin - E11, E00, E000, YR0000, R00
Hair - E37, E35, E33, E31
Wings - RV000, RV0000
I hope you like my tutorial, and will make some of these easy flowers for yourself!
Thanks for stopping by!
Linking up at:
Follow Me:
Current Design Teams:

Karen Aicken
Kulbir Kirkland
Laura Nehring - that's me!
Meghan Kennihan
Sam Olden
Christy - Owner & Artist
Laura - that's me!
Nicola